
Introduction
I wanted to build a 2D racing game from scratch without relying on existing game engines like Godot or Unity. To achieve this, I chose to build my own game engine in C++.
The result is vroom, an arcade-style racing game featuring drift physics, procedurally generated tracks, and waypoint-based AI.

It’s built with C++20 and SFML3. The UI is written with Dear ImGui (using ImGui-SFML). Persistent configuration storage is handled by toml++, logging by spdlog, and unit testing by snitch.
Everything is cross-platform, with pre-built binaries available for macOS, GNU/Linux, and Windows.
Learning by Building
Looking at the Git history, the project started with a basic 2D world in SFML, then gradually gained features such as car movement, track generation, AI, menus, sounds, and persistent configuration.
Using C++20
My previous projects used C++17, mainly because GitHub Actions runners didn’t fully support C++20 at the time, and SFML3 was also on C++17. After finishing my C++17 project aegyo (a GUI Korean learning app), I wanted to move to C++20. Key features I used include:
Mathematical constants (std::numbers):
#include <numbers>
const float heading_difference =
    std::remainder(desired_heading - current_heading, 2.0f *
        std::numbers::pi_v<float>);
std::format for type-safe string formatting:
#include <format>
std::format("{}x{} ({}-bit)",
            mode.size.x, mode.size.y, mode.bitsPerPixel);
[[likely]] and [[unlikely]] attributes:
if (current_state == core::states::GameState::Playing) [[likely]] {
    // Game logic runs most of the time
} else [[unlikely]] {
    // Menu/pause states are less frequent
}
It’s not a huge list, but std::format allowed me to remove the third-party fmt library. It’s convenient, though not quite as nice as Python f-strings.
CMake and Assets
I used CMake to manage the build and dependencies. As always, libraries are pulled automatically via FetchContent rather than Git submodules, so a normal git clone is all you need. Strict compile flags are enabled by default, but options are configurable:
# Project options with sensible defaults
option(BUILD_TESTS "Build tests" OFF)
option(ENABLE_COMPILE_FLAGS "Enable compile flags" ON)
option(ENABLE_STRIP "Enable symbol stripping for Release builds" ON)
option(ENABLE_LTO "Enable Link Time Optimization" ON)
option(ENABLE_CCACHE "Enable ccache for faster builds" ON)
Assets (textures and sounds) are embedded directly into the executable as headers. To achieve this, I wrote asset-packer, a simple CLI tool in C. Plenty of alternatives do exist, but I keep everything in the spirit of learning by building.
Track Generation
Procedural track generation was one of the hardest parts. Handling detours was tricky since different corner textures had to be placed depending on orientation.
The track uses textures from Kenney’s Racing Pack, upscaled with Waifu2x. The algorithm builds rectangular layouts with optional “detour bubbles” along the edges. Width, height, and detour probability are configurable in the UI, and the AI adapts to any configuration.
Bubble Detours
The track is built in phases:
- Layout Planning: Calculate grid dimensions and tile placement.
- Corner Placement: Place four corners for the outer boundary.
- Edge Processing: Place edge tiles with optional detour bubbles.
- Bubble Generation: Place detours probabilistically with validation.
- Waypoint Creation: Generate AI waypoints with straight/corner classification.
Vertical edges can sprout “bubbles” that widen sections and add corners. The algorithm checks available space before placing one, ensuring proper connection back to the main track.
// Simplified vertical edge bubble placement algorithm (runs on track generation)
void place_detour_bubbles(float main_x, float detour_x)
{
    for (std::size_t row = 1; row < vertical_count - 1;) {
        if (random_float() < detour_probability) {
            // Find viable bubble heights that fit in remaining space
            vector<std::size_t> viable_heights;
            for (auto height : {3, 4}) {  // Allowed bubble sizes
                if (row + height < vertical_count)
                    viable_heights.emplace_back(height);
            }

            if (!viable_heights.empty()) {
                auto height = choose_random(viable_heights);

                // Place entry curves
                place_tile(entry_curve_main, {main_x, row_y});
                place_tile(entry_curve_detour, {detour_x, row_y});

                // Place vertical segments
                for (std::size_t i = 1; i < height - 1; ++i)
                    place_tile(vertical_tile, {detour_x, row_y + i * tile_size});

                // Place exit curves
                place_tile(exit_curve_detour, {detour_x, row_y + (height - 1) * tile_size});
                place_tile(exit_curve_main, {main_x, row_y + (height - 1) * tile_size});

                row += height;  // Skip past this detour
                continue;
            }
        }
        // No detour: place regular vertical tile
        place_tile(vertical_tile, {main_x, row_y});
        ++row;
    }
}
Car Physics
Car physics were another major challenge. I aimed for arcade-style handling: fun, simple, responsive, and not realistic. Cars are treated as points with velocity and rotation. Each frame applies input, acceleration, drag, slip, steering, and movement, with delta time keeping it consistent.
The result is fast acceleration and easy drifting. It doesn’t require a lot skill, but it’s fun to play, which was the goal.
Physics is applied inside the Car class. A full physics engine might be something I build later in a future project.
In fact, I don’t like how it runs on every frame, I’d prefer to optimize it further but that’d require a major refactor and at that point, I might as well develop a full physics engine.
// Simplified physics implementation (runs on every frame)
void Car::apply_physics_step(const float dt)
{
    // Calculate forward direction from current sprite rotation
    const float heading_radians = this->sprite_.getRotation().asRadians();
    const sf::Vector2f forward_vector = {std::cos(heading_radians), std::sin(heading_radians)};
    float current_speed = std::hypot(this->velocity_.x, this->velocity_.y);

    // Apply acceleration if enabled
    if (this->current_input_.throttle > 0.0f) {
        const float throttle_force = this->current_input_.throttle *
                                     this->config_.throttle_acceleration_rate_pixels_per_second_squared * dt;
        this->velocity_ += forward_vector * throttle_force;
        current_speed = std::hypot(this->velocity_.x, this->velocity_.y);
    }

    // Apply braking if enabled and moving
    if (this->current_input_.brake > 0.0f && current_speed > stopped_speed_threshold) {
        const float brake_force = this->current_input_.brake *
                                  this->config_.brake_deceleration_rate_pixels_per_second_squared * dt;
        const float brake_reduction = std::min(brake_force, current_speed);
        const sf::Vector2f velocity_unit = this->velocity_ / current_speed;
        this->velocity_ -= velocity_unit * brake_reduction;
        current_speed -= brake_reduction;
    }

    // Apply handbrake if enabled and moving
    if (this->current_input_.handbrake > 0.0f && current_speed > stopped_speed_threshold) {
        const float handbrake_force = this->current_input_.handbrake *
                                      this->config_.handbrake_deceleration_rate_pixels_per_second_squared * dt;
        const float new_speed = current_speed - handbrake_force;
        if (new_speed < stopped_speed_threshold) {
            this->velocity_ = {0.0f, 0.0f};  // Complete stop to prevent jitter
        }
        else {
            this->velocity_ = (this->velocity_ / current_speed) * new_speed;
        }
        current_speed = std::max(new_speed, 0.0f);
    }

    // Apply engine drag if no input and moving
    const bool no_input = (this->current_input_.throttle <= 0.0f &&
                           this->current_input_.brake <= 0.0f &&
                           this->current_input_.handbrake <= 0.0f);
    if (no_input && current_speed > stopped_speed_threshold) {
        const float drag = this->config_.engine_braking_rate_pixels_per_second_squared * dt;
        const float speed_after_drag = std::max(current_speed - drag, 0.0f);
        const float drag_scale = (current_speed > 0.0f) ? speed_after_drag / current_speed : 0.0f;
        this->velocity_ *= drag_scale;
        current_speed = speed_after_drag;
    }

    // Apply maximum speed limit if exceeded
    if (current_speed > this->config_.maximum_movement_pixels_per_second) {
        const float scale = this->config_.maximum_movement_pixels_per_second / current_speed;
        this->velocity_ *= scale;
        current_speed = this->config_.maximum_movement_pixels_per_second;
    }

    // Get forward and lateral velocity components
    const float signed_forward_speed = dot(forward_vector, this->velocity_);
    const sf::Vector2f forward_velocity = forward_vector * signed_forward_speed;
    const sf::Vector2f lateral_velocity = this->velocity_ - forward_velocity;

    // Apply lateral slip damping (simulating tire friction)
    const float slip_damping = 1.0f - std::clamp(
                                          this->config_.lateral_slip_damping_coefficient_per_second * dt, 0.0f, 1.0f);
    this->velocity_ = forward_velocity + lateral_velocity * slip_damping;

    // Apply steering wheel angle if enabled
    if (std::abs(this->current_input_.steering) > 0.01f) {
        const float steering_rate = this->current_input_.steering *
                                    this->config_.steering_turn_rate_degrees_per_second * dt;
        this->steering_wheel_angle_ += steering_rate;
    }
    else {
        // Otherwise, auto-center
        if (std::abs(this->steering_wheel_angle_) > this->config_.steering_autocenter_epsilon_degrees &&
            current_speed > 0.0f) {
            const float centering_factor = std::clamp(
                this->config_.steering_autocenter_rate_degrees_per_second * dt /
                    std::abs(this->steering_wheel_angle_),
                0.0f, 1.0f);
            this->steering_wheel_angle_ = std::lerp(this->steering_wheel_angle_, 0.0f, centering_factor);
        }
        else {
            this->steering_wheel_angle_ = 0.0f;
        }
    }

    // Clamp steering to physical limits
    this->steering_wheel_angle_ = std::clamp(this->steering_wheel_angle_,
                                             -this->config_.maximum_steering_angle_degrees,
                                             this->config_.maximum_steering_angle_degrees);

    // Apply steering based on speed
    if (std::abs(signed_forward_speed) > this->config_.minimum_speed_for_rotation_pixels_per_second) {
        const float speed_ratio = std::clamp(current_speed / this->config_.maximum_movement_pixels_per_second, 0.0f, 1.0f);
        const float steering_sensitivity = std::lerp(
            this->config_.steering_sensitivity_at_zero_speed,
            this->config_.steering_sensitivity_at_maximum_speed,
            speed_ratio);
        const float direction_sign = (signed_forward_speed >= 0.0f) ? 1.0f : -1.0f;
        // Apply rotation to sprite
        this->sprite_.rotate(sf::degrees(direction_sign * this->steering_wheel_angle_ * steering_sensitivity * dt));
    }

    // Apply velocity to sprite
    this->sprite_.move(this->velocity_ * dt);

    // If not on track, bounce off walls
    if (!this->track_.is_on_track(this->sprite_.getPosition())) {
        // ...
    }
}
AI Behavior
The AI system was one of the most complex parts.
While building the track, the system also creates waypoints for the AI to follow. Each tile gets a waypoint at its center, and the system marks them as either straight sections or corners based on the tile type. After the track is built, the waypoints get reordered to start from the finish line so the AI cars can follow them in the right racing order.
Thus, regardless of configuration, the AI can always find its way around the track. The difficult part is making sure it doesn’t just drive into walls due to excessive speed while also not being slow and boring.
So how does the AI work? They follow a sequence of waypoints placed along the track.
On every frame, each car (including the player) runs an update() function. For AI cars, it sets the AI inputs based on the car’s position, velocity, and the direction of the next waypoint.
The AI checks the distance to the next waypoint to determine if it has been reached. Once a waypoint is reached, the AI advances to the next one, looping through the track. Waypoints are classified as Straight or Corner based on the procedurally generated track layout.
To steer, the AI compares the car’s current heading to the direction of the next waypoint. If the misalignment exceeds a threshold, the AI turns left or right. When approaching corners, the AI turns earlier and more aggressively; on straight sections, it steers more smoothly.
The AI sets a target speed depending on whether the car is approaching a corner or traveling on a straight. If the current speed exceeds the target, the AI decelerates; if it is below the target, it accelerates. If the speed is close to the target, the AI coasts, relying on drag.
To avoid collisions, the AI scans ahead for potential wall impacts. If a crash is likely, it applies the handbrake and increases steering. The current, somewhat conservative values seem to prevent the AI from crashing into walls.
To prevent AI cars from behaving identically, each instance uses its own random number generator. This introduces small variations in reaction distances, turn sensitivity, and target speeds.
The AI logic updates at 30 Hz. I did quite a bit of testing and found that 20 Hz is acceptable, while 10 Hz causes frequent wall collisions. Physics simulation runs at the current frame rate and uses delta time to maintain consistent behavior across different refresh rates. I don’t like that part, I’d rather have a fixed timestep for physics, but as I’ve said, that would require a major refactor.
Sound Effects
I used SFML’s audio system for all the sound effects. All the audio files come from OpenGameArt.org, which has lots of free game assets.
The most complicated audio feature is the car engine sound itself. I took a basic car engine loop sound from OpenGameArt and looped it. The code then simulates a 5-gear transmission by calculating fake RPM values based on car speed, figuring out what gear the car should be in, and adjusting the pitch and volume accordingly.
On top of that, tire screeching plays when you’re drifting, using a tire squeal sample that fades in and out based on how much you’re sliding. When you hit walls, it plays a collision sound that I slowed down to 60% speed in Audacity for more impact, with volume based on how hard you hit.
Lastly, every button click and menu interaction plays a sound effect from UI sound packs.
For all sounds, the volume controls work in real time and are saved to the config file using toml++.
Window Management
Getting a window from SFML is easy. Creating a game-engine-like system that can handle switching between fullscreen and windowed modes, different resolutions, and anti-aliasing settings is a bit more complex. On top of that, I wanted to support V-sync and frame rate limiting. All of these settings should be configurable in the UI and saved to a config file on disk.
The tricky part is that when you change certain settings like anti-aliasing, you have to completely recreate the SFML window because those properties can only be set when the window is first created. Changing the frame rate limit or V-sync does not require a window recreation, but they cannot be enabled at the same time, so I had to handle that as well.
I ended up recreating the window whenever the user changes any setting for simplicity, as it allows me to apply all changes at once.
Settings System
The settings system loads configuration at startup and saves it when the app closes. All the values are validated to prevent crashes if someone manually edits the config file or if there are corrupted values. For example, FPS values are checked against a list of supported frame rates.
Notably, getting the game to work on different operating systems meant figuring out where to save config files. Each OS has different conventions for where applications should store user data.
I wrote platform-specific code that uses the native APIs to find the right directories:
- Windows: Uses
SHGetFolderPathto get the Local AppData folder. - macOS: Uses the Foundation framework’s
NSSearchPathForDirectoriesInDomainsto get the Application Support directory. - Linux: Follows the XDG Base Directory Specification by checking
XDG_DATA_HOMEfirst, falling back to~/.local/shareif not set.
This ensures config files end up in the right places:
- macOS:
~/Library/Application Support/vroom/config.toml - Linux:
$XDG_DATA_HOME/vroom/config.toml(or~/.local/share/vroom/config.toml) - Windows:
%LOCALAPPDATA%/vroom/config.toml
ImGui User Interface
The UI uses Dear ImGui with the Moonlight theme. It looks more like a game UI than a debug panel but I built it with mouse and keyboard in mind, so gamepad support is pretty bad outside of just driving the car. If I were to build it again, I’d start with gamepad first, then add mouse/keyboard support later.
To integrate ImGui with SFML, I used the ImGui-SFML, creating an RAII ImGuiContext class that initializes the binding on construction and cleans up on scope exit. It’s completely seamless.
Widgets
I built several ImGui widgets to show real-time game information:
- FPS Counter: Shows current frame rate.
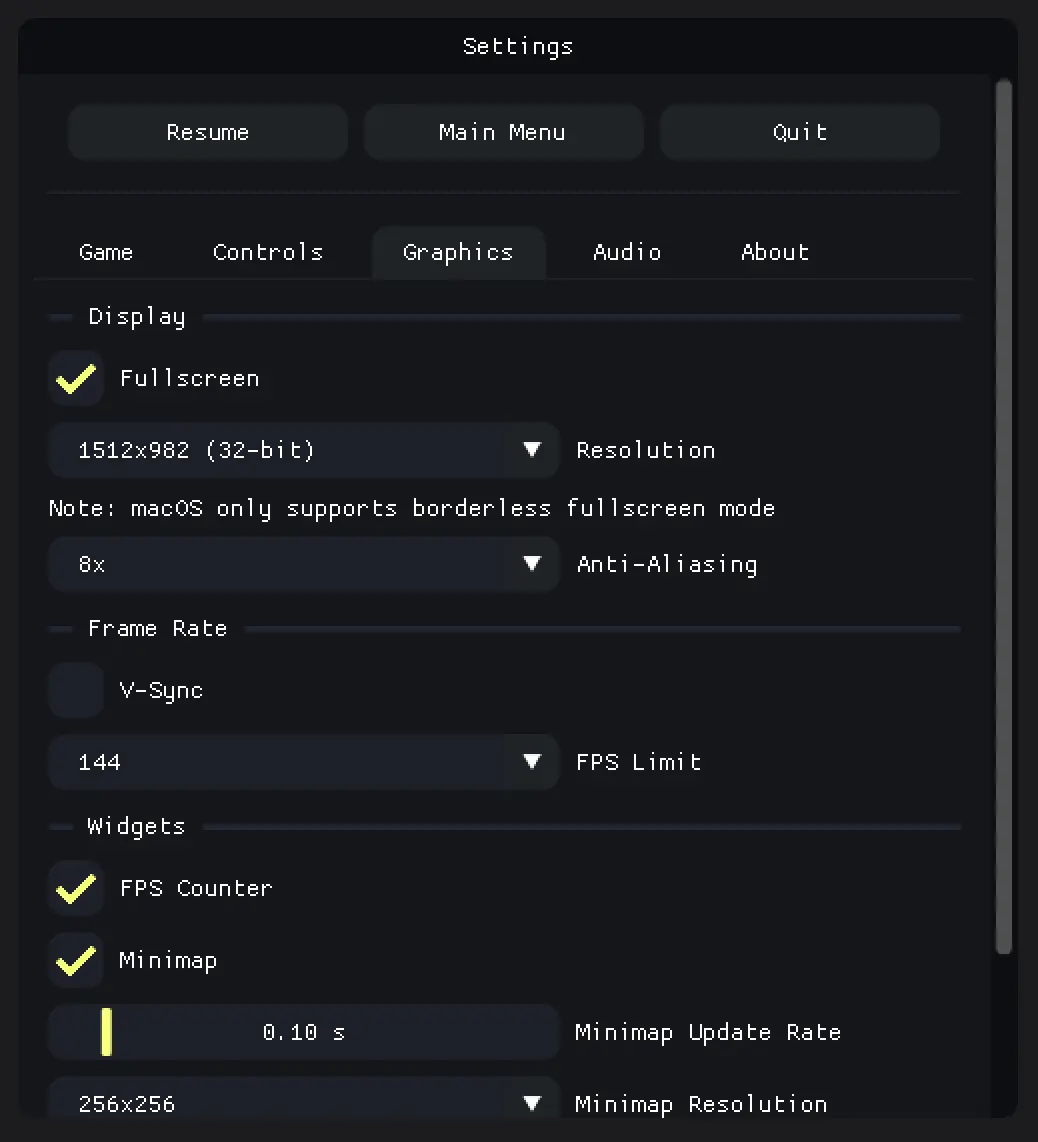
- Minimap: One of the more complex widgets - it renders the entire game scene to an SFML render texture, then displays that texture in an ImGui window. Features include configurable refresh rate and adjustable resolution (256x256, 512x512, or 1024x1024).
- Leaderboard: Tracks drift scores for all cars. It automatically sorts by score.
- Speedometer: Displays current speed in kilometers per hour (km/h).
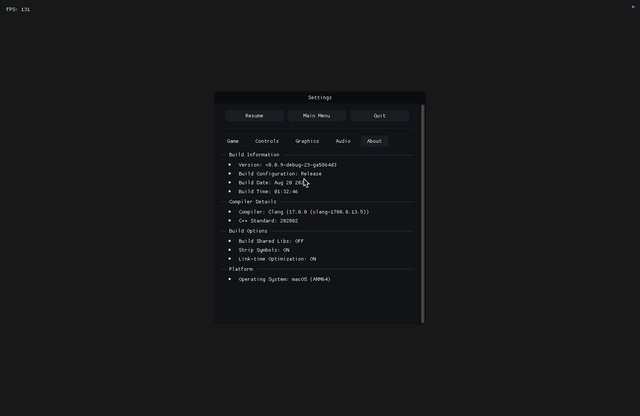
Settings Menu
A tabbed layout with five sections. All changes apply immediately.
- Game: Track generation (width, height, tile size, detour probability), camera zoom, followed car.
- Graphics: Window/fullscreen, resolution, anti-aliasing, V-sync, FPS cap.
- Controls: Toggle between keyboard and gamepad, with full gamepad remapping alongside live input display.
- Audio: Engine, tire, wall hit, and UI volumes. Changes apply instantly.
- About: Build and system info.
The aforementioned settings system saves everything on exit (i.e., when the game closes). On the next boot, all values are validated when loaded to prevent crashes from corrupted config files.
Testing
On each push, automated testing is performed on the latest versions of macOS, GNU/Linux, and Windows using GitHub Actions.
The project uses snitch for unit testing.
What I Learned
I used RAII throughout the project to avoid manual memory management, following modern C++ best practices. The embedded asset system allows for a single binary distribution across platforms, simplifying deployment.
All in all, I learned how to use C++ and SFML to build a complete game engine, with graphics, sound, and input handling (including gamepad support). I also learned how to build a user interface using Dear ImGui.
Final Thoughts
Building vroom from scratch was a valuable learning experience.
The complete source code is on GitHub, with pre-built binaries for macOS, Linux, and Windows.